Monday, September 12, 2011

How to make a ruffled shirt.


Mid-morning I got that creative feeling again. Twice in four days might be a little too much, but, oh well.  Like before, I had to make something, but this time, I knew what I wanted.  I had been looking at this Lady and this Lady's tutorials on how to make a ruffled tee.  Oh man! was I inspired. I had...so...many unused shirts.  I needed help.  All summer I don't think I wore a single one of these shirts. Oh, well, I will now! 

Confession: I was slightly pushed on by the urge for another blog post and the other half, true enticement. 

I want to help you transform your closet by totally changing an old shirt to a fashionable, well-used favorite.


These are all the shirts I had to choose from. *sigh* They all were a simple t-shirt, or a tank-top. (a little boring)


 I picked my favorite color out of the mix and got started.


I stirred around and 'round and, finally, instead of using an identical shirt, I used an old skirt bought for the purpose of being minced. 

(See the hem? That is what I used.)


I grabbed a ruler and measured 1 1/2 inches down from the neckline and marked it all the way around.


I cut it out with scissors and just eyed it from point to point. 


 The fold is a total of 1/2 an inch, but I folded it down 1/4 inch and then rolled it down again.


Stitch this down with your sewing machine, or by hand.


I rolled down the raw edge of the lace (skirt hem) and just did a good old fashioned stitch.  About every inch I would fold it back and make a pleat  for decoration and to make it fit the circular neckline.


 Ahh!  It's cute. I was so torn between leaving it or adding a flower, but it was even cuter with the flower.


Flower embellishment:

I cut off about a 9 inch strip of the skirt hem and ran a large stitch around the top and pulled tight.  Since my ends weren't finished I just sewed them together. 


*    *    *

Finished project! 


Due to the knit fabric, I intend to run a basting stitch around the inside of the neckline and pull it tight a little bit to secure the neckline.

Wednesday, September 7, 2011

An adorable little wallet!


I had a random artistic splurge. I had to use my energy in that form or else. Or else what I'm not sure, but or else. After about 60 seconds of Google searching for an idea, and no search results, I decided to follow instinct.  Up to the craft room I ran. I rummaged through all forms of craft items while my mind was working frantically.  There was no need for a useless knick-knack, so that cut out many ideas.  I don't really remember, it is all so fuzzy, but I thought up wallet-type-thing somehow.  

I went to the filing cabinet and ripped the cardboard backing to the scrapbook embellishments off and put it on the desk, ready for use. 

  1. Fold cardboard backing in half.


After plowing through the most random fabrics with the most random shapes and sizes, Aha! I found the perfect piece. Remember now, that I had no really clear plan of action. I was just going with the flow. 

2.Pick out the perfect fabric for the base.


Creasing the fabric in the places I wanted the folds to be and making sure it was tight, I had the outline of the pattern :).

3.I cut my fabric 10" wide and the length was just what ever it was originally cut to. It will all depend on your cardboard size. The 10" width is just an extra inch added to each side of the base for "seam allowance".


The hot glue gun was my hero!  You might say that I cheated, but I really didn't see any way around it. I hot glued and glued and glued.  Two sticks later I finished the project.

4.Use the hot glue gun to stick down every edge. Pink your edges (cut with a jagged-edged pair of scissors) and roll all edges under before gluing down!


I was about halfway through and feeling so proud of myself at all my progress/creativity when I burned myself with the hot glue. I guess I should be careful; I always burn myself. If it makes you feel better, you can see how ugly my hot-glue lines are. I later conveniently covered them with fabric (cheating does work sometimes!):). 


By this point in the project I thought I was heading toward a check book cover. I needed an inside so I dug in the fabric basket some more, even more than before, and this is what I found: an old, cut off skirt hem. Yay! It was perfect.  It is a light pink on a black and white toile. It is just a recipe for cute. Just sayin'.


I pinked the top and hot glued around the top and sides, leaving the bottom open. I neatly covered the slightly raw look of the rolled under edges. 
5. Add a cute fabric inside in whatever style you like.


 I am sorry, but I sort of forgot about making pictures with all of the steps, but I hope this gets you started.  

What I love about the wallet-check-book cover is that it has two faces! 

     Side A: Off centered flower:
  • Cut a long strip of fabric, just about a 2" wide, pinked on the edges. Baste (long stitches) about 1/4"-1/2" inside the edge. Pull tight and knot. Glue it down. Ta Da! Here it is:


Secret: the fabric, when wrapped around, makes one side right-side up and the other side upside-down. Now is when you have to fix it. Cover it up :)!

Side B: Ruffled

  • Use one piece for the back, and layer up two more.  With the top layer, crease the top down, close to the seam at the top of the first ruffle.  If this is confusing, just look at the picture.
  • Embellished center: short strip, 2" wide, and baste through a pleated center. Glue down.


It is so cute, if I say so myself! I love it and I can't wait to use it, but first I have to put a little clasp on. I will put a hook and chain on; you can choose whatever you like.

Have fun if you end up trying it out!


Thursday, September 1, 2011

Pumpkin Spice


I am sure that most of you are quite unaware of the fact that Mama and Susan Liana (Sissy) are pretty much on a whole foods diet.  It is a long story and a long list of yes and no foods, so I won't go into detail, but I will say that no gluten is on the list. I merely stated this to give you a background behind this cake and why on earth we would take the time to try it.

Monday night I walked into the kitchen and found Sissy cooking away at a new gluten free cake. It was our after dinner treat. The cake was lemon flavored and delicious, but it needed a few tweaks. I instantly started thinking of all the possibilities to make it fun/great/exciting. With Fall approaching, a spice cake came to mind. After school the next day, I took over the kitchen. I changed the recipe as I went along, and I was surprised that when it was ready to be eaten it wasn't in any need of change. I was excited about that! The Pumpkin Spice Cake is slightly more moist than the original recipe. I am biased, but, y'all(!), it was really good. 


Pumpkin Spice Cake (Gluten Free)

  • 6 eggs
  • 1/2 cup pumpkin puree
  • 1/4 coconut milk (alternative: almond milk or experiment with it)
  • 7 Tablespoons of honey (or other sweetener)
  • 1 teaspoon vanilla extract
  • 1 teaspoon cinnamon
  • 1/4 teaspoon ginger
  • 1/8 teaspoon ground cloves
  • 1/8 teaspoon nutmeg 
  • 1/2 cup coconut flour
  • 1/2 teaspoon baking powder
  • 1/2 teaspoon sea salt
Take your eggs out of your refrigerator and allow them to come to room temperature. Preheat the oven to 350 degrees and grease a metal pie pan. Whisk the eggs, coconut milk, honey, vanilla, cinnamon, ginger, cloves, and nutmeg together.  

Combine coconut flour, baking powder, and salt.  Stir the dry ingredients into the wet.  Mix the pumpkin puree  into the batter until all the lumps are gone.

Pour the batter into your greased pan and place on the middle rack of the oven. Bake for 35-40 minutes, until browned on top and a toothpick comes out clean.  Place on a cooling rack. 

After the cake has cooled, apply topping.


Pumpkin Spice Cake Topping
  • 1/2 cup coconut oil
  • 1 1/2 Tablespoon honey
  • 1/2 teaspoon vanilla extract
  • 1/2 teaspoon cinnamon
  • pinch of: salt, ground clove, ginger, and nutmeg  
Mix all ingredients in a small saucepan. Heat up until the oil is melted and the honey is well mixed in.  Pour liquid into a bowl and place the bowl in the freezer in order to cool it down. it is very important to check on it every couple of minutes to catch it before it gets too cold.  You want to take it out of the freezer right when it starts to get cloudy.  At this point the cold bowl (and your cool kitchen) will continue to turn the liquid oil into a solid.  Continue to whisk the frosting as it gets cloudier and cloudier and eventually turns into a whipped butter consistency.  The idea is to get a bit of air into it.  Once it is to a whipped (very soft) butter consistency plop it onto your cooled cake.  Frost it very quickly before the coconut oils hardens.  It will seem pretty thin layer of frosting, but it is just enough. 

-You can order coconut flour here, and coconut oil in the health food section at your local grocery store.

I hope you all just love it!  


Saturday, August 27, 2011

Torches, Fire, and a Camera

Last night there were three amazing cameras laying around and two girls who just happen to be photography lovers.  It was very discouraging taking pictures at night in brown rooms when you are trying for artistic photos. It just doesn't work. It only took a reminder, just a mention of, "why don't y'all take pictures outside of the torches?" to start us off.  BEELINE! It was the best suggestion ever and so much fun!  


We decided that the zipper looking streak across the picture was a bug! The rest of the picture isn't that great, but I thought it was so cool.

Monday, August 22, 2011

School has started and rainy days have commenced.

 Not that those two things particularly go together, but it just happens to add an atmosphere to life.  I was wearing a jacket this morning (inside of course) and after lunch, when I stepped outside, I began to wonder about myself.  How could I be cold with over 100 degree weather outside my front door?  Two hours later the weather changed once again, this time to a nice storm.  I attempted pictures, but, if I wanted to keep the camera functioning, I couldn't be as adventurous as I had wished.  I am so looking forward to when I can say 'Guess what y'all? It is 70 degrees outside!'.  That's a Southerner's way of saying 'Fall'.

In the meantime, school here at my house has been in progress for two weeks!  I won't roll my eyes and say 'I don't like school', but I will say 'I really don't know where Summer went'.  At the moment I think most everyone feels that way.  I am enjoying school though quite unable to believe that I have started High-School! Well, I will enjoy it all I can, counting the days until memorable events...
                          

The beauty after the storm.

Wednesday, August 17, 2011

Jewelry Making

About a year ago I went over to my friend's house for the day, and while I was there she introduced me to jewelry making. Ever since, I've been gung-ho. Christmas presents, birthday presents, and birthday money were the times for requests for supplies of this sort. So, like I said, ever since, I've been caught. I love it! I really do. And I am always looking for someone to shower jewelry upon. My friend had her birthday last week and I jumped on the opportunity. While I made her some (purple) earrings, I decided to also make some for another friend (green). I have some more people in mind for the future. I can't wait!

Tuesday, July 19, 2011

Moon and Stars

Terrifying. Utterly and completely terrifying. Looking back I realize where the family conversation was going, but I wasn't paying any attention in the other room. Maybe I should have.

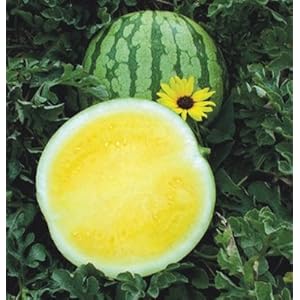
After awhile I got curious. I think curiosity just might be the death of me. So I walked right up to the kitchen table to see what the laughter was about. Then I saw it. A yellow watermelon. I think I almost had a heart attack. Pink/red watermelons have always been what we bought. I had always heard about the Moon And Star variety, but I never dreamed of eating one!

I closed my eyes for the first bite. I kept them closed the whole time I ate it. Peeking once made me scared again. They said it tasted slightly different, but I think I was too busy making it pink in my mind that I didn't notice.


It was very good, but I don't think I can handle another one.

Maybe I'm dramatic...